
Almost two years later
In a previous message I mentioned I was thinking about starting a new crochet project, but instead I picked up an old unfinished project!

This bolero was started over 2 years ago from a free pattern found through Ravelry. It’s made from 10 squares, which I finished and assembled on the go. And then I got stuck on the border. I wasn’t sure if I wanted one and if I did, how I should crochet it. So the bolero disappeared from sight, uncertain if I considered it finished or not.
And now, almost two years later I found it again and decided that it could do with a border after all.
I dug up the original pattern and had a look at the border instructions. Those instructions are just a schematic representation on a number of chain stitches.
After considering the scheme and my bolero, I decided to just have a go at it. I would first try to recreate the round 1 by crocheting groups of chain stitches all around the edge. The pattern indicates groups of 7 and 3 chains, but I didn’t like the look of the large hole the 7 chains made. Therefore I stuck with groups of 3 and 5 chains.
To begin, I laid out my bolero to see where to start with attaching my yarn. Eventually it seemed that a corner was the best and most inconspicuous place to start.

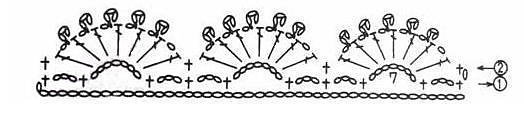
Here’s what I did (US terminology):
Border – round 1:
Attach thread with slst in the middle of a corner and make a sc in the same stitch. Then:
ch3, sc, *ch5, sc, ch3, sc, ch3, sc*;repeat from * around the edge of the bolero.I made the single crochets either in a stitch or a chain of the previous round, depending where I was. No strict rules, I just made sure the spacing was somewhat even. To end I also made sure I ended with a (ch5, sc, ch3) to have the round be continuous. To finish round 1, slst in the first sc of the round.
Border – round 2:
ch1 and turn work. Then:
sc in same stitch as slst, *in next ch5-space: [dc, ch, (dc,picot,ch)x5, dc]; sc in the stitch between the two ch3-spaces*; repeat from * around
As you can see, I was fairly faithful to the original pattern.
For the armholes I mainly followed the same instructions. The only difference was that I did not want the shells to go under the armpits. I thought that would be annoying and ticklish. Therefore I first marked the centre of the armpits for both armholes and then I started round 1 as described above from that stitch. Round 2 was changed slightly to, as mentioned, not have any shells underneath the armpits.
Border armholes – round 2:
ch1 and turn work. Then:
sc in same stitch as slst, 3sc in ch3-space, sc in sc, 5sc in ch5-space, sc in sc, 3sc in ch3-space, sc in sc; *in next ch5-space: [dc, ch, (dc,picot,ch)x5, dc]; sc in the stitch between the two ch3-spaces*; repeat from * around until 1 ch5-space is left. 3sc in ch3-space, sc in sc, 5sc in ch5-space, sc in sc, 3sc in ch3-space, slst in first sc of round to finish off.
When I finished crocheting this border and had weaved in all the ends, I put the bolero on. I felt it turned out a bit big, especially without closure. I thought a tiny button to close the front of the bolero would make it look even more elegant. Since I didn’t have any cute buttons lying around, I decided to try my hand at making one myself. I crocheted a tiny, round button amigurumi-style. A button hole was not necessary, since there’s enough lace work that can be used for that.
Crocheted button:
The button is crocheted in spirals, like amigurumi.
Het knoopje wordt amigurumi-gewijs in spiralen gehaakt.
- Make a magic ring with 6sc
- increase around (12sc)
- sc around (12sc)
- sc around (12sc)
- decrease every third stitch (9sc)
- decrease every second stitch (6sc)
- Decrease until you can no longer OR close the opening by weaving the tail through the remaining stitches and pulling tight
While you’re crocheting the button, don’t forget to fill it with scrap yarn or fiberfill. Eventually the button will look a bit like a raindrop. The pointy end is the end that needs to get sewn to one corner of the bolero. Once it’s firmly attached you can still run your needle through the whole button and bring it back down a stitch further. If you pull now the button will get a flatter top. Do make sure you do not pull too tight so you can still use the button!
And then I thought it was finished. It worked out very nicely and the button was a stroke of genius, even if I do say so myself.
Curious?

Ta-dah! Beautiful, right?
I really like how it turned out. Looks much better with the border. Now it actually looks finished!
The only thing I’m a little disappointed about is that the bolero has grown a tad bit larger after washing. I was very careful during washing it to not stretch the thread, but cotton does tend to grow a lot especially when it’s lace.
Not that it is now humongous. At least, I don’t think it is, but I do think it would look better with a tighter fit.
I should hear the opinion of someone else. Perhaps I’ll wear it to work one day and see the reactions.
To show you the difference between the bolero without and with border, I tried to recreate the pictures I had taken two years ago. I still own (and fit) the same top!

Under: with border (today)
And what do you think? Successful?
Cheers,
Charlotte

